For homeowners across Long Island—from the coastal breezes of Montauk to the dense suburbs of Nassau County—winter brings more than just picturesque snowscapes. It brings the silent, heavy, and potentially devastating threat of ice dams. While a row of glistening icicles hanging from your gutters might look like a winter wonderland scene, to a restoration construction specialist, those icicles are a flashing red warning light. They indicate a thermal failure in your home’s attic that could lead to thousands of dollars in structural damage.
In this comprehensive guide, we will dive into the mechanics of why ice dams form specifically on Long Island homes, how to identify the warning signs before water enters your living room, and the only safe methods for ice dam removal Long Island residents should trust to protect their property investment.
The Science of Ice Dams
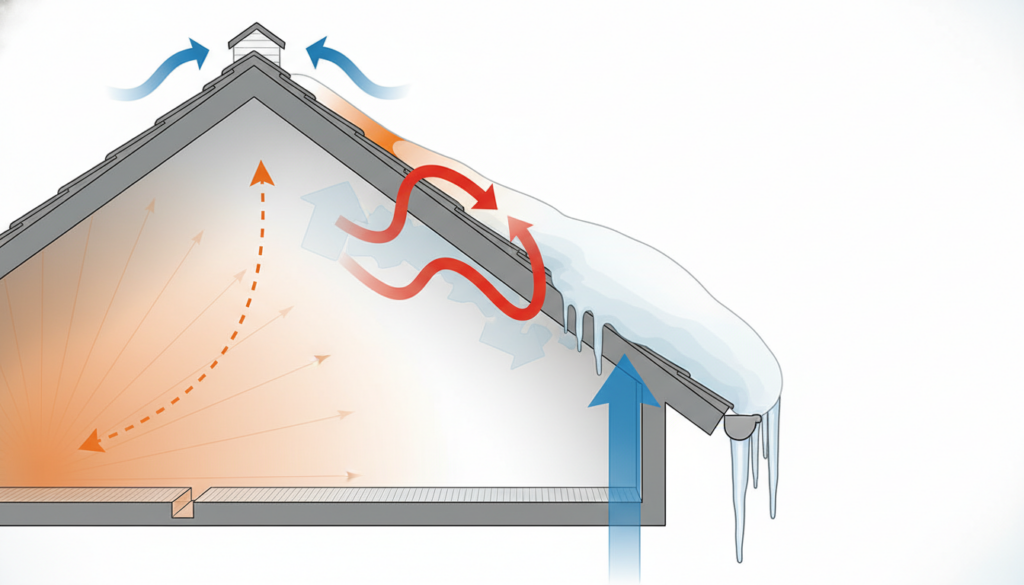
An ice dam is not just a “snow problem”; it is fundamentally a “heat problem.” To understand how they form, we have to look at the three temperatures of your roof. According to the University of Minnesota Extension, a leading authority on cold-climate building science, ice dams are created by a complex interaction between the heat inside your home, the snow cover on your roof, and the ambient outdoor temperature.
The process follows a specific, destructive cycle:
- The Heat Leak: Warm air escapes from your living space into the attic. This happens through “attic bypasses”—unsealed gaps around recessed lights, plumbing stacks, chimneys, and pull-down stairs.
- The Underside Melt: This escaped heat warms the roof deck. The snow touching the shingles begins to melt from the bottom up, even if the outdoor temperature is well below freezing.
- The Eave Freeze: As the meltwater runs down the roof under the blanket of snow, it eventually reaches the “eaves” or the overhang. Because the eaves are not positioned over the heated attic, they remain at the outdoor freezing temperature. The water refreezes here, forming a ridge of ice.
- The Reservoir: As more snow melts, the water pools behind this ridge of ice. Since it has nowhere to go, it backs up under the shingles, finds its way through the plywood sheathing, and begins its descent into your insulation, ceilings, and wall cavities.
On Long Island, our proximity to the Atlantic Ocean creates a unique challenge. We often experience “marginal” freezes where temperatures hover right around 32°F, accompanied by high humidity. These conditions are the “perfect storm” for rapid ice dam accumulation and subsequent water intrusion.
Signs You Have an Ice Dam
Early detection is the difference between a simple steam removal service and a full-scale storm and disaster recovery project. Many homeowners wait until they see a puddle on the floor, but by then, the damage is already extensive.
Large, Heavy Icicles
A few small icicles are normal, but if you see thick ice formations extending from the gutter down to the ground, or icicles forming behind the gutter or through the soffit vents, you have a major ice dam. This indicates that water is already bypassing your drainage system.
Gutter Strain
Ice is incredibly heavy (weighing about 57 pounds per cubic foot). If your gutters appear to be bowing, pulling away from the fascia board, or sagging, they are likely filled with solid ice. This weight can rip the gutters off the house, damaging the siding and the roof’s edge in the process.
Hidden Interior Damage
Key Takeaway: Interior water damage from ice dams is often hidden in wall cavities. You might notice a faint “musty” smell or see slight bubbling in the paint near window frames or along the top of exterior walls. This is because the water follows the path of least resistance—often running down the studs inside the wall before it ever shows up as a ceiling stain.
Water Staining
Look for dark spots on the ceiling or moisture on the interior side of your windows. If you have an unfinished attic, check the rafters for wet wood or “frost” on the underside of the roof deck. Frost in the attic is a clear sign that warm, moist air is escaping from your home and freezing on contact with the cold roof.
Safe Removal Techniques (Steam vs. Impact)
When an ice dam is discovered, the instinct for many Long Islanders is to grab a ladder and a hammer. This is the single most dangerous thing you can do for both your personal safety and the integrity of your roof. High-altitude ice removal is a specialized task that requires specific equipment.
To help you understand the options, refer to the safety and efficacy table below:
| Method | Safety Rating | Risk to Roof |
|---|---|---|
| Low-Pressure Steam | High | Low (Best Method) |
| Hammers/Axes | Low | High (Shingle Damage) |
| Calcium Chloride Pucks | Moderate | Moderate (Corrosion) |
| Pressure Washer | Low | High (Forces water under shingles) |
Why Low-Pressure Steam is the Gold Standard
At our restoration firm, we exclusively use low-pressure, high-temperature steam. Unlike a pressure washer—which uses blunt force to “blast” ice away—a professional steamer uses thermal energy to “cut” the ice into manageable chunks. The steam is gentle enough that you could run your hand in front of the nozzle without injury, yet it melts through a foot of ice in seconds. This method ensures that the granules on your asphalt shingles remain intact, preserving the lifespan of your roof.
The Dangers of Impact and Chemicals
Using a hammer or ice pick in freezing temperatures is a recipe for disaster. Shingles become brittle when cold; a single misplaced swing can crack the shingle or punch a hole through the roof deck. Similarly, while “salt socks” (filling a stocking with calcium chloride) can create a channel for water to escape, they are a temporary band-aid. The salt runoff can corrode aluminum gutters, kill your landscaping below, and leave unsightly white streaks on your siding.
Furthermore, if your home has already suffered from the devastating effects of ice storms, you need a professional who doesn’t just remove the ice but understands the structural drying process. Our team specializes in interior drying capability for resulting leaks, ensuring that moisture trapped in your walls doesn’t turn into a mold colony by springtime.
Permanent Prevention: Insulation & Ventilation
Removing the ice dam solves the immediate emergency, but without addressing the root cause, the dam will return with the next snowfall. Permanent prevention is a two-pronged approach: keeping the attic cold and ensuring the roof deck stays at a uniform temperature.
Step 1: Seal the Bypasses
The most important step is air sealing. You must stop the “chimney effect” where warm air rises through your house and leaks into the attic. We use specialized foam and caulk to seal:
- Gaps around the chimney masonry.
- Openings for plumbing vent pipes and electrical wires.
- The perimeter of the attic hatch or pull-down stairs.
- Recessed “can” lights (which should be replaced with IC-rated, air-tight LED fixtures).
Step 2: Upgrade Insulation
For Long Island’s climate zone, the Department of Energy recommends an R-value of R-49 to R-60 for attics. Most older homes in towns like Levittown or Smithtown were built with significantly less. By blowing in cellulose or installing fiberglass batts to the proper depth, you create a thermal barrier that keeps heat in the living space where it belongs.
Step 3: Proper Ventilation
A cold roof is a safe roof. This is achieved through a “balanced” ventilation system. Soffit vents (intake) at the bottom of the roof and ridge vents (exhaust) at the peak allow cool outdoor air to circulate under the roof deck. This air flow carries away any residual heat that escapes the insulation. To ensure this works, we install “baffles” or “rafter vents” to prevent insulation from clogging the soffit openings.
The Restoration Specialist Advantage
When you hire a professional for ice dam removal Long Island, you aren’t just paying for someone to clear snow. You are hiring a specialist who understands the building envelope. Our unique approach includes:
- Thermal Imaging: We use infrared cameras to locate exactly where heat is escaping from your ceilings, allowing for surgical precision in air sealing.
- Structural Drying: If the ice dam has already leaked, we use industrial dehumidifiers and air movers to dry out wall cavities from the inside out, often without having to tear down the drywall.
- Gentle Steam Equipment: Our customized steamers are designed specifically for roofing materials, ensuring zero damage to your shingles or gutters.
FAQ: Insurance and Ice Dams
Q: Does insurance cover ice dams?
A: This is a common point of confusion. Most standard homeowners’ insurance policies cover the result of the ice dam (the water damage to your ceilings, walls, and floors), but they rarely cover the removal of the ice dam itself. Think of it like a pipe burst: insurance pays for the floor, but you pay the plumber to fix the pipe. However, getting the ice removed professionally is a “mitigation” step that insurance companies expect you to take to prevent further damage.
Conclusion
Ice dams are a formidable opponent for any Long Island homeowner, but they are not unbeatable. By understanding the science of heat transfer and opting for safe, low-pressure steam removal, you can protect your home from the silent threat of winter water damage. Remember: icicles are just the symptom; the real problem is the heat in your attic and the blockage at your gutters. Don’t wait for the ceiling to drip—take action as soon as you see the signs.
Need Immediate Help?
Don’t risk your roof with hammers or high-pressure water. Our specialists provide the safest steam removal and full interior restoration services on Long Island.